Goal: Make the app save real data, let people sign up and log in, and give each customer their own page.
What we're doing
Right now your app looks great — but it's all fake. Refresh the page and everything resets. There are no real customers, no saved data, nothing permanent.
In this module, we make it real. By the end:
People can sign up with their email and log in to the app
Everything they create — their links, their colors, their layout, their bio, all of it — gets saved to their account
When they come back and log in, it's all still there
Their public page at yourdomain.com/page/username shows their saved data to the world
This is how real apps work. Let's set it up.
What is Supabase?
Supabase does two things for us:
Authentication — It handles sign-up and login. Email, password, sessions — all of it. We don't have to build any of that from scratch.
Database — It stores everything. Every link someone adds, every color they pick, every bio they write. It's like a spreadsheet in the cloud that your app reads from and writes to automatically.
It's free to start and it's designed to work with apps exactly like ours.
Why can't we just save things to the computer?
When your app is live on the internet, it runs on a temporary server that resets every time you update your site. "Saving to a file" doesn't work because that file gets wiped clean during the reset. You need a database—a permanent storage box in the cloud that stays put no matter what.
Step 1: Create a Supabase account and project
Verification
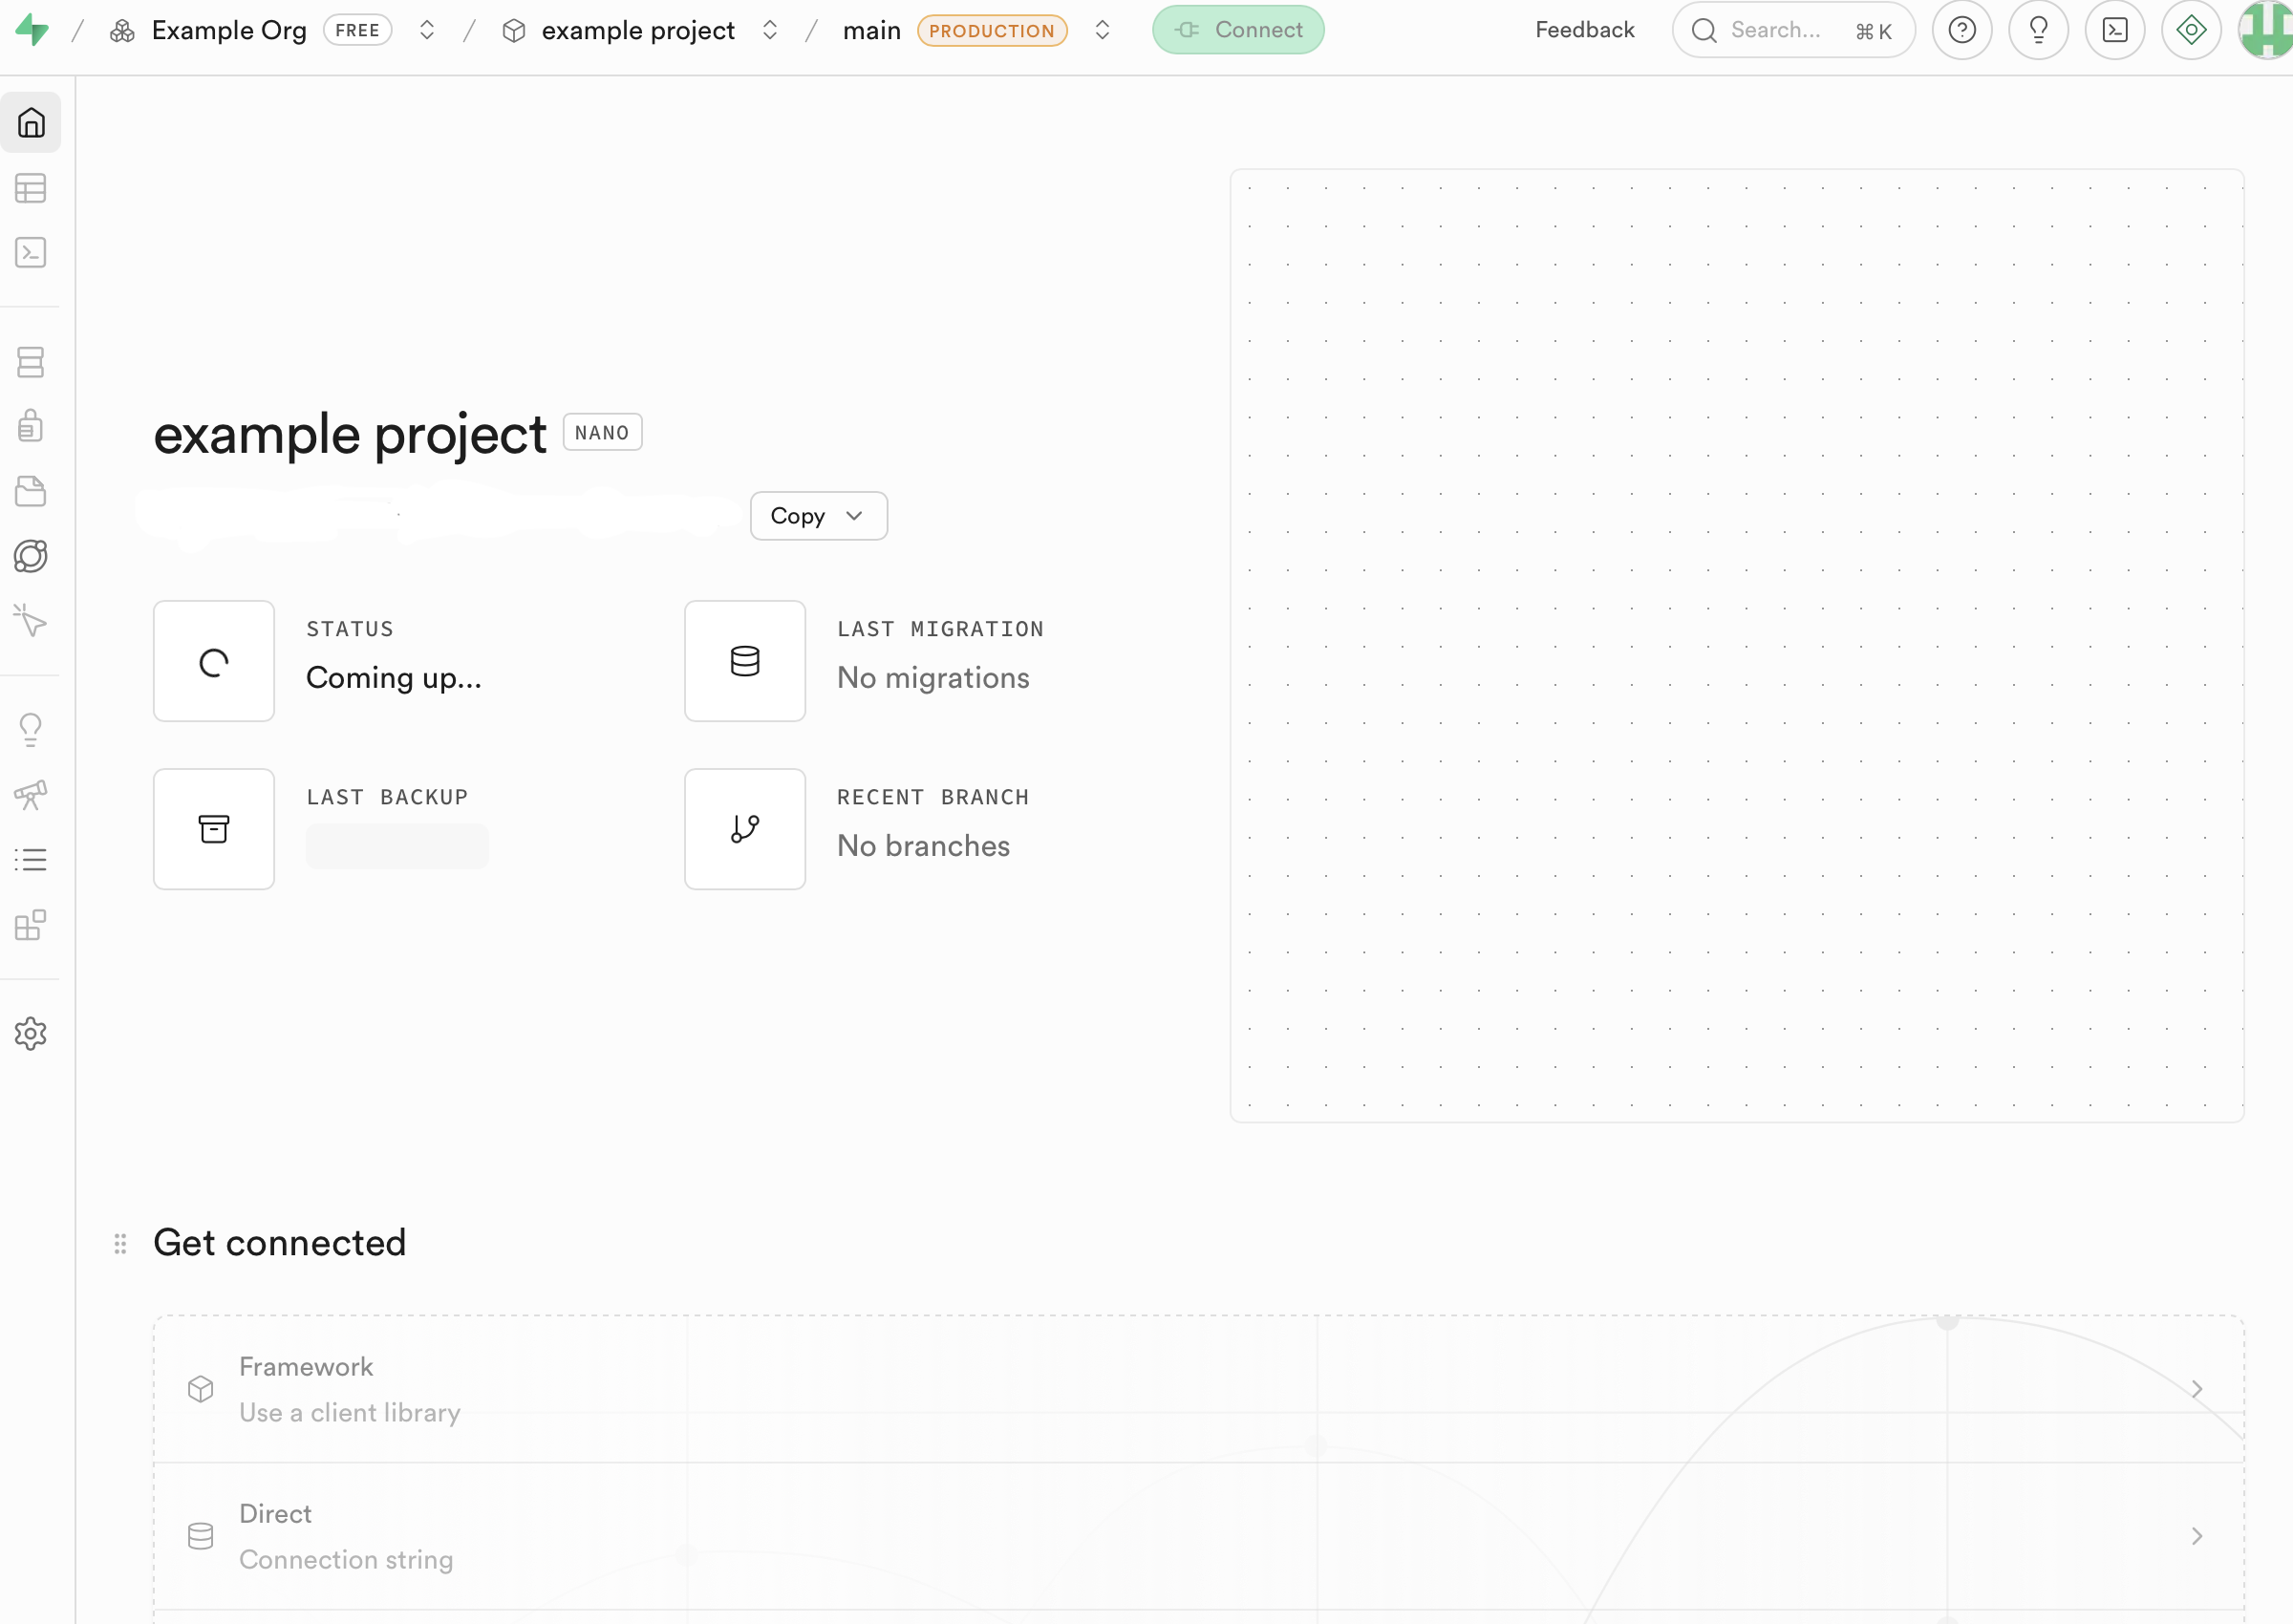
Success: Your project status in the Supabase dashboard shows as Active (green light) and you can see the full project sidebar.
Step 2: Connect the Agent to Supabase
Instead of copying keys and URLs back and forth between Supabase and your Agent, we're going to give the Agent a direct connection to your Supabase project. This uses something called MCP — think of it as giving the Agent its own login to Supabase. Once connected, the Agent can set up your database, grab your project details, and manage everything directly. No copy-pasting required.
Verification
Success: The Agent lists your project name and project ID accurately. Failure: If the Agent says "I don't have access" or "Project not found," check that your access token was set to "Never" expire and try reconnecting.
Step 3: Connect your app to Supabase
Now that the Agent has direct access to your Supabase project, let's have it wire everything up.
Use your Supabase MCP connection to set up Supabase in Linktree-clone. Get my project URL and API keys directly from Supabase — don't ask me to copy anything.
Install whatever packages are needed, create the client configuration, and store the credentials in .env.local. Make sure everything works with Linktree-clone.
If anything goes wrong, explain what happened in plain English and how to fix it. I'm non-technical and copy-pasted this from a guide — please keep all explanations in plain English.
AI PromptSet up Supabase in Linktree-clone — Put this in your IDE
Use your Supabase MCP connection to set up Supabase in Linktree-clone. Get my project URL and API ke...
Click to expand
Verification
Success: You see a new .env.local file in your project explorer containing your NEXT_PUBLIC_SUPABASE_URL and NEXT_PUBLIC_SUPABASE_ANON_KEY. You should also see new library files (like supabase.ts) that the Agent created to handle the connection.
Step 4: Set up sign-up and login
Now we add customer accounts. Supabase handles all the login logic — we just need to configure a couple of things and build the pages.
Important: the dashboard stays open to everyone. People should be able to visit the dashboard, build their page, pick colors, add links — all without signing up first. They only need to create an account when they click Save (to save their work) or Publish (to make their page live). This way people can try before they commit.
Why do we need redirect URLs?
When someone signs up or logs in, Supabase handles the verification and then sends them back to your app. If your URL isn't on the approved list, Supabase refuses to redirect — and the login just silently breaks. This is the #1 thing that trips people up, so double-check both URLs are added.
Now let's build the actual sign-up and login pages.
Use your Supabase MCP connection throughout — do not ask me to copy or paste anything into Supabase.
Email confirmation is already turned off (we disabled it in the step above), so users can sign in immediately after signing up — build accordingly.
Before writing any code, check via MCP: Does a profiles table exist in the database? If it does not exist, create it through the MCP with these columns: id (uuid, primary key, references auth.users on delete cascade), username (text, unique, not null), display_name (text), is_published (boolean, not null, default false), created_at (timestamptz, not null, default now()), updated_at (timestamptz, not null, default now()). Enable Row Level Security on it.
Read my blueprint.txt. Build sign-up and login pages for Linktree-clone, connected to Supabase Auth.
Sign-up page (/signup):
Email and password fields — the password field must have a toggle (eye icon) to show/hide the password
Username field — this becomes their public URL (domain.com/page/username)
Show a live availability check as the user types: green checkmark if the username is free, red X if it's taken. Query the profiles table via the Supabase client.
Only allow lowercase letters, numbers, hyphens, and underscores (no spaces, 1–50 characters). Validate client-side before submitting.
Show a preview below the field: "Your page will be at: domain.com/page/[username]"
After sign-up: automatically create a row in profiles for the new user (set id and username at minimum), then redirect to /dashboard
Login page (/login):
Email and password fields — the password field must have a toggle (eye icon) to show/hide the password
Translate all Supabase error codes into plain English — never show raw codes. Example: Invalid login credentials → "Wrong email or password. Please try again."
A working "Forgot password?" flow — build every step of this precisely:
Clicking "Forgot password?" reveals an email input and a "Send reset link" button.
Call supabase.auth.resetPasswordForEmail(email, { redirectTo: window.location.origin + '/reset-password' }). This tells Supabase to send the user to /reset-password when they click the link in the email — not /login.
Build a dedicated /reset-password page. On load, call supabase.auth.onAuthStateChange and listen for the PASSWORD_RECOVERY event — Supabase fires this automatically when the user arrives from the reset email link. When that event fires, show the reset form.
The reset form has two fields: "New password" and "Confirm password". Minimum 8 characters. Validate that both fields match before submitting. Show all errors in plain English — never raw Supabase error codes.
On submit: call supabase.auth.updateUser({ password: newPassword }). On success, Supabase automatically establishes a session (the user is now logged in) — redirect to /dashboard and show a toast: "Password updated. You're now logged in."
After login: redirect to /dashboard
Dashboard behavior:
The dashboard is open to everyone — no login required to visit, build a page, add links, or pick colors.
When a visitor clicks Save or Publish without being logged in, capture their current work in state, redirect to /signup (or /login if they already have an account), and after they authenticate, restore their work and save it automatically.
Logging out clears the session and redirects to the landing page (/).
Navigation:
Not logged in → show "Login" and "Get Started" / "Sign Up" buttons
Logged in → replace those buttons with a "Dashboard" button only. No logout in the nav — logout lives exclusively in the Account tab of the dashboard.
Apply this everywhere those buttons appear across the app: landing page, dashboard, and any other pages
Design:
Match the existing app design system: warm palette, Plus Jakarta Sans, cream backgrounds as defined in blueprint.txt. Sign-up and login pages: centered card layout, no sidebar.
Important — the app currently has a stub: There is a LoginPromptModal component that shows a fake login form when Save or Publish is clicked. Replace it with real auth: clicking Save or Publish without being logged in should redirect to /signup instead of opening that modal. Before redirecting, save both the current page state AND the intended action ('save' or 'publish') to sessionStorage. After the user authenticates, redirect to /dashboard and restore the page state from sessionStorage back into PageContext. Do not attempt to save to the database here — the database does not exist yet. The actual auto-save fires in Step 5 once the database is set up.
When you're done, explain anything I need to do manually, and walk me through how to test sign-up, login, and the forgot password flow. I'm non-technical and copy-pasted this from a guide — please keep all explanations in plain English.
AI PromptBuild sign-up and login pages — Put this in your IDE
Use your Supabase MCP connection throughout — do not ask me to copy or paste anything into Supabase....
Click to expand
Verification: Auth
Success:
Sign up: You sign up and land on the dashboard instantly — no email confirmation required.
Login: Log out (from the Account tab), go to /login, and log back in — you land on the dashboard.
Navigation: When logged in, the Login and Get Started buttons are replaced by a Dashboard button. When logged out, they reappear.
Forgot password: On the login page, click "Forgot password?", enter your email, and check your inbox. Click the link in the email — you should land on /reset-password, not the login page. Enter a new password twice and confirm it. You should be automatically logged in and land on the dashboard.
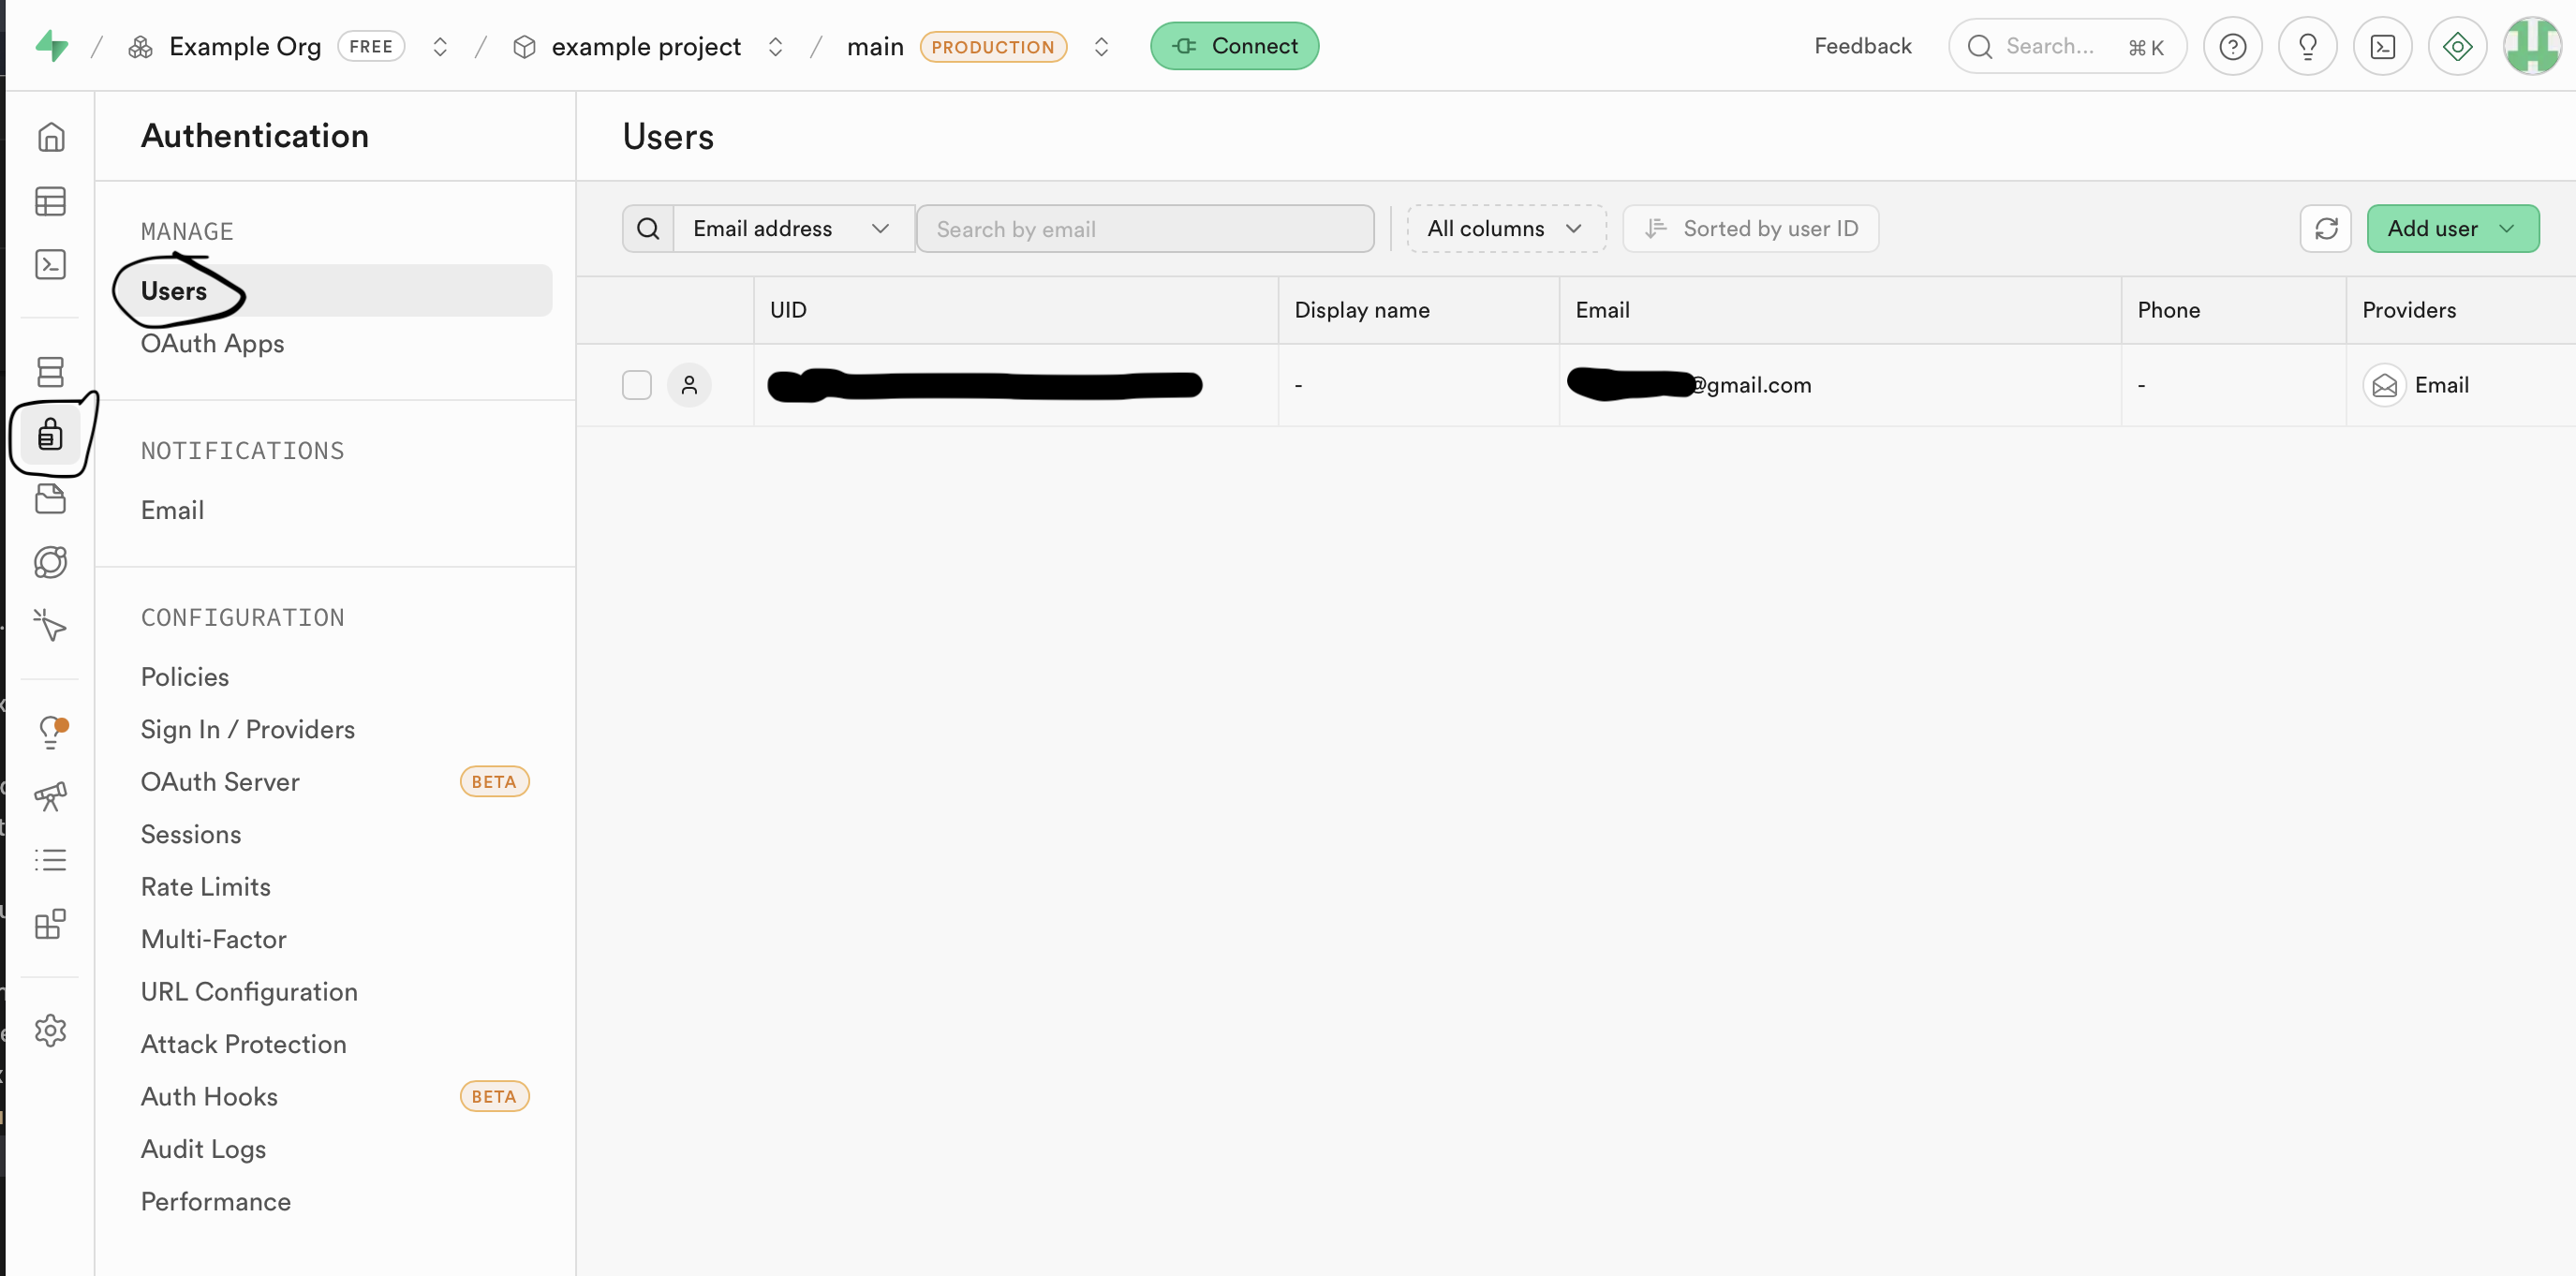
Dashboard: Go to your Supabase dashboard, then Authentication > Users. You'll see all your users here. If necessary, you can add or delete them here manually.
These five things only test authentication. Saving and persistence across sessions is tested after the database is set up in Step 5.
Step 4b: Save your work
Before we move on to the database, let's save what we've built so far to GitHub.
Save all my work to GitHub. Stage everything — including any new pages, Supabase configuration files, and any database migration SQL you created — commit it with a clear message about adding Supabase authentication, sign-up, and login, and push it. I'm non-technical and copy-pasted this from a guide — please keep all explanations in plain English.
AI PromptSave to GitHub — Put this in your IDE
Save all my work to GitHub. Stage everything — including any new pages, Supabase configuration files...
Click to expand
Step 5: Build the database and save everything
Now that customers can sign up, we need somewhere to save their data. This is the big one: everything about a customer's page gets saved to the database. Their links, their bio, their colors, their background, their social media handles, their payment settings — literally everything. When someone logs in, their entire page is loaded exactly as they left it.
We also need security rules so that each person can only edit their own page. Without this, anyone could change anyone else's data.
What are "security rules"?
Imagine your database is an apartment building. Right now every door is wide open — anyone can walk into any apartment. Security rules (called "Row Level Security" in Supabase) are the locks on the doors. Each person gets a key that only opens their own apartment. Visitors can see the lobby (public pages), but they can't get into anyone's unit.
The app has two important buttons that do different things:
Save — saves the customer's work to the database. Their page is still private (draft mode).
Publish — saves their work AND makes their page live at domain.com/page/username for the world to see. Publishing requires payment ($12/year), which we'll wire up in the next module. For now, the Publish button should exist but the payment part won't work yet.
Read my blueprint.txt. Use the Supabase MCP connection to set up the entire database. Run all SQL directly through the MCP — don't ask me to copy or paste anything into the Supabase dashboard.
Check first via MCP: A profiles table may already exist from the previous step. If it does, extend it with any missing columns rather than dropping and recreating it. Build the rest of the schema around it.
Create the database tables. Look at the blueprint — the database needs to store everything about each customer's page. All their profile info, all their links, their appearance settings, their social handles, their payment button settings, whether their page is published or still in draft — everything. Design the tables however you think is best. Each customer's data should be linked to their Supabase auth account.
Set up security rules (Row Level Security) so that:
Anyone on the internet can view a published customer's page
Only the owner of a page can edit their own data
Nobody can see or touch anyone else's private data
This includes the profiles table from Step 4 — it has RLS enabled but no policies yet, which means it currently denies all access. You must add policies to it here.
Connect the app to the database:
The app currently holds all page data in React Context (PageContext.tsx). Update it so that when a logged-in user opens the dashboard, their data is fetched from Supabase and populated into that context. When they click Save, the entire current context state is written to the database in one go. Visitors who are not logged in use the in-memory default state only — do not attempt any database fetch for logged-out users.
Pending sessionStorage action (the pre-auth flow): When the dashboard loads and the user is logged in, check sessionStorage for a pending entry left by the pre-auth redirect from Step 4. If one exists, restore the saved page state into PageContext and immediately auto-fire the pending action — no second click needed: 'save' → write the state to the database as a draft and show a "Draft saved" toast; 'publish' → write the state to the database and set is_published to true (the Stripe payment gate will be added in the next module), then show a "Your page is now live" toast. Clear the sessionStorage entry after firing regardless of which action ran.
A user who has just signed up and has no saved data yet should see a clean, empty dashboard — no placeholder links, no bio, no seed data. Only show the in-memory seed data to visitors who are not logged in.
For image fields (avatar, extra photo): create a public Supabase Storage bucket named media via MCP (set it to public so URLs are accessible without authentication), upload files to it, and store the returned public URL in the database — do not store raw data URLs.
Update the Account tab to display the logged-in user's real email address from Supabase auth (supabase.auth.getUser()), replacing the hardcoded placeholder.
Account deletion must actually delete the user. The "Delete Account" button in the Account tab must call a server-side API route (e.g. /api/account/delete) — not a client-side Supabase call. That route uses a Supabase admin client initialised with the SUPABASE_SERVICE_ROLE_KEY (get this via MCP — it must never be used on the client or prefixed with NEXT_PUBLIC_), calls supabase.auth.admin.deleteUser(userId), and returns a success response. Because the profiles table references auth.users with ON DELETE CASCADE, deleting the auth user automatically wipes all their data from the database. After the API route responds with success, clear the client session and redirect to /. If this is not done through the admin API with the service role key, the deletion will silently fail and the user will still exist in Supabase auth.
When a customer signs up, create their profile in the database automatically
When they're logged in, the dashboard loads all their saved data exactly as they left it
The global Save button writes everything to the database at once — one button saves it all
Critical — include all required fields in every save: The username column is NOT NULL. Every upsert to profiles must include username alongside all other data. If you omit it, the database silently rejects the write — the user sees no error but nothing is saved. Pull the username from the profile fetched on dashboard load and always pass it explicitly in every save call.
is_published is a real database column, not a JSON field: When Save is clicked, write is_published: false as a top-level column. When Publish is clicked, write is_published: true as a top-level column. Never nest it inside a JSON blob or a data object — it must be a direct column so the public page can query it correctly.
The public page at /page/[username] fetches the customer's data from the database and shows it — not from React state
If a username doesn't exist, show a "this page doesn't exist but you can claim it" button
If the profile exists but isn't published, show "This page isn't live yet"
Public pages must be Next.js Server Components (an async function that fetches from Supabase before the page renders, server-side). The HTML must arrive in the browser already containing the real data — do NOT use useEffect or any client-side data fetching on the public page. A client-side fetch causes a 1–3 second flash of placeholder content before the real data appears.
Save vs Publish:
Save saves the customer's work to the database. Their page stays in draft mode — only they can see it.
Publish saves AND makes the page live at domain.com/page/username. Publishing requires payment, which will be wired up in the next module. For now, the Publish button should save the data but the payment/publishing part can be a placeholder.
If anything goes wrong, explain what happened in plain English and how to fix it. After you're done, confirm the tables and security rules are active, and walk me through what you built. I'm non-technical and copy-pasted this from a guide — please keep all explanations in plain English.
AI PromptSet up the database and connect everything — Put this in your IDE
Read my blueprint.txt. Use the Supabase MCP connection to set up the entire database. Run all SQL di...
Click to expand
Note: This is a big step! It can take a few minutes for the Agent to build the entire database and connect everything.
Pro Tip
Just tell the Agent what you see. Tell it what is not working and it will find and fix the problem.
Verification: Database Tables & Saving
Success:
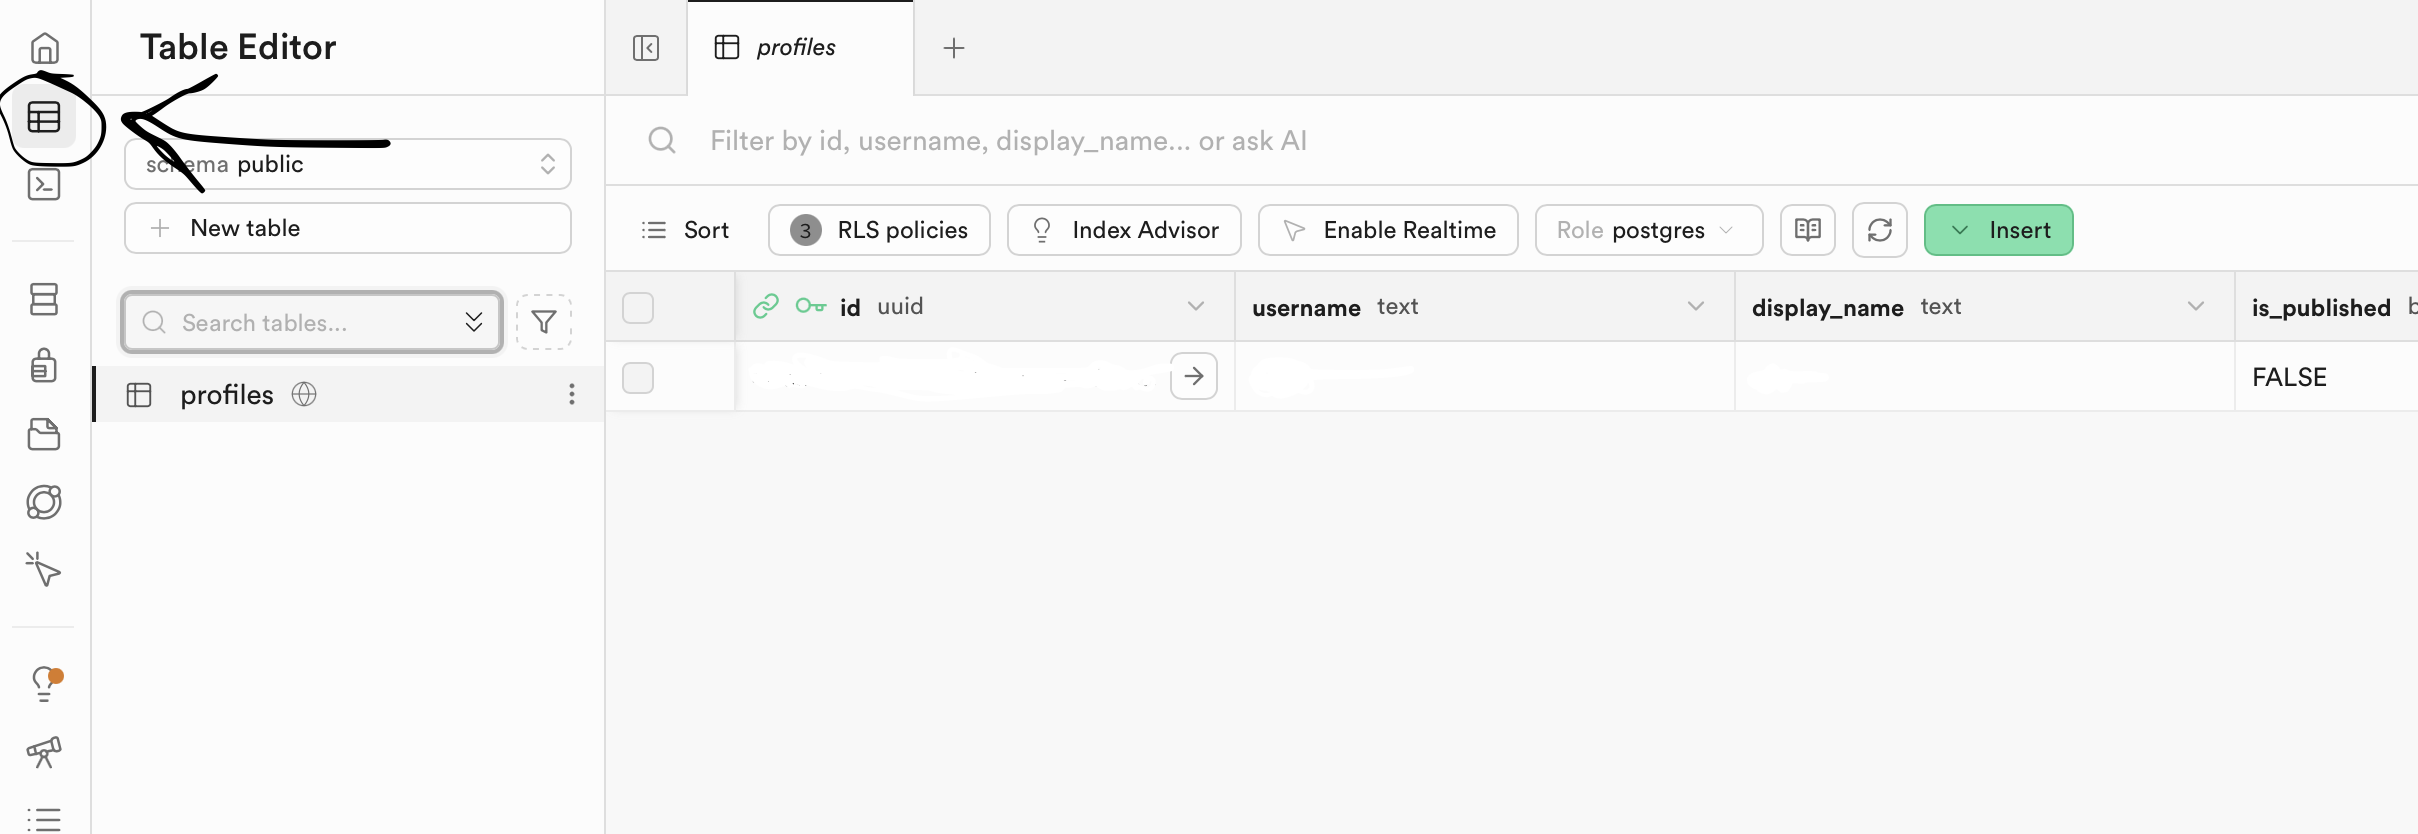
Tables exist: Go to Supabase → Table Editor. You should see tables like profiles and links already created.
Save works: Change your Bio on the dashboard and click Save.
Persists on refresh: Hard-refresh the page (Cmd+R / Ctrl+R) — your changes should still be there.
Persists across sessions: Open a fresh incognito window, log in with your test account — everything should look exactly as you left it.
Step 6: Test the complete flow
Before we push anything, let's make sure the whole thing works end to end.
The publish flow — where the customer pays to make their page go live — gets wired up in the next module when we add Stripe. For now, manually flipping is_published in Supabase lets us test that the public page works correctly.
Remember the difference: Save keeps your work safe but private. Publish makes it live for the world to see (and requires payment).
Step 7: Deploy to Vercel
Your app works locally — now let's make sure the live site works too. We need to tell Vercel about the Supabase connection.
Save all my work to GitHub. Stage everything, commit it with a clear message about what was built (Supabase database, customer accounts, sign-up, login, and saving), and push it. Walk me through anything I need to do. I'm non-technical and copy-pasted this from a guide — please keep all explanations in plain English.
AI PromptPush to GitHub and Vercel — Put this in your IDE
Save all my work to GitHub. Stage everything, commit it with a clear message about what was built (S...
Click to expand
Verification
Your app is now live. Go through the same test steps from Step 6 again — but this time on your live Vercel URL, not localhost. Sign up, save, refresh, log out, log back in, test the public page. Everything that worked locally should work the same way in production.